Staining veneer isn’t just a passing trend; it’s a game-changer in interior design. Veneer has long been a staple in furniture and home improvement projects, offering a cost-effective way to mimic the look of solid wood. But what if you could take it a step further? What if you could enhance that veneer to make it uniquely yours? That’s where staining comes into play. In this article, we’ll delve into the art of staining veneer, exploring its benefits and how it can elevate your home’s aesthetic.
Understanding the Veneer World
Veneer is a fascinating subject in itself. It’s not just a thin layer of wood slapped onto furniture; it’s a product of craftsmanship, history, and innovation. But what exactly is veneer? Veneer refers to thin slices of wood, usually ranging from 1/8 inch to 1/32 inch in thickness, that adhere to a stronger substrate and are often made of less expensive material. The concept of veneer dates back to ancient Egypt, where it was used to create intricate designs on furniture and caskets.
Types of Veneer
There are primarily two types of veneer you’ll encounter:
- Hardwood Veneer: Made from traditional lumber species like oak, cherry, and walnut. It’s often used in high-end furniture and offers a rich, natural look.
- Laminate Veneer: Made from layers of paper or fabric impregnated with resin. It’s more affordable and offers a wide range of colors and patterns.
Uses of Veneer
Veneer is incredibly versatile. It’s used in everything from furniture and cabinetry to musical instruments and even airplane interiors. Its widespread use is due to its ability to provide the look of solid wood without the hefty price tag.
Why Veneer Sheets Matter
The type of veneer sheet you choose can significantly impact the final look of your project. Different wood species offer varying grains, colors, and textures. So, a veneer sheet fits the bill, whether you’re aiming for a rustic charm or modern sleekness.
Setting the Stage for a Perfect Stain
Before you even think about opening that can of stain, some groundwork must be done. Literally. Prepping the veneer surface is crucial to making or breaking your staining project. Proper preparation ensures the stain adheres well, looks even, and lasts longer.
Cleaning the Veneer
The first step in your pre-staining journey is cleaning. Over time, a veneer can accumulate dirt, grease, and grime, interfering with stain adherence.
Tools Needed:
- Soft cloth
- Mild detergent or wood cleaner
Steps:
- Dampen a soft cloth with a mixture of water and mild detergent.
- Gently wipe the veneer surface, making sure to follow the wood grain.
- Rinse with a clean, damp cloth and let it dry completely.
Pro Tip: Avoid harsh chemicals or abrasive pads, which can damage the veneer.
Sanding the Surface
Sanding is where the magic happens. It smooths out imperfections and opens up the wood grain, allowing the stain to penetrate more deeply.
Tools Needed:
- Fine-grit sandpaper (120-220 grit)
- Sanding block or electric sander
Steps:
- Start with a lower-grit sandpaper to remove any old finish or imperfections.
- Progress to a higher-grit paper for a smoother finish.
- Always sand in the direction of the wood grain to avoid scratches.
- Wipe away any sanding dust with a tack cloth.
Pro Tip: Consider using a sanding block for corners and hard-to-reach areas.
Repairing Imperfections
Let’s face it; no piece of veneer is perfect. You might encounter chips, cracks, or holes needing TLC before staining.
Tools Needed:
- Wood filler or repair kits
- Putty knife
Steps:
- Choose a wood filler that matches the color of your veneer.
- Apply the filler using a putty knife, smoothing it into the imperfections.
- Allow it to dry as per the manufacturer’s instructions.
- Sand the repaired areas until they are flush with the surrounding veneer.
Pro Tip: For larger repairs, consider using a veneer patch. Cut a piece of matching veneer and adhere it over the damaged area using wood glue.
Conditioning the Wood
Wood conditioner is like a primer for your veneer. It helps to ensure an even stain by preventing blotchiness.
Tools Needed:
- Wood conditioner
- Paintbrush or cloth
Steps:
- Apply a thin coat of wood conditioner using a paintbrush or cloth.
- Allow it to penetrate the wood for about 15 minutes.
- Wipe away any excess conditioner with a clean cloth.
Pro Tip: Always test the conditioner on a scrap veneer to ensure it doesn’t affect the stain color.
Mastering the Staining Technique
You’ve prepped the surface, gathered your supplies, and now it’s showtime. Staining veneer is an art form that requires patience, precision, and a bit of technique. But fear not! We’re here to guide you through each step of the process, ensuring that you master the art of staining.
Choosing the Right Stain
Before diving in, picking the right stain for your project is crucial. Wood stains come in various types: oil-, water-based, and gel. Each has pros and cons, so choose based on your specific needs and the look you’re looking for.
Types of Stains:
- Oil-Based Stains: Offer deep penetration and are ideal for hardwood veneers.
- Water-Based Stains: Quick-drying and offer a wide range of colors. Suitable for laminate veneers.
- Gel Stains: Thick and easy to control, perfect for vertical surfaces or intricate designs.
Pro Tip: Always test the stain on a scrap piece of veneer to ensure it gives the desired color.
Safety First
Staining involves chemicals, so safety should be your top priority.
Safety Gear:
- Safety goggles
- Rubber gloves
- Well-ventilated area
Pro Tip: Read all safety instructions on the stain packaging.
The Staining Process: Step-by-Step
Tools Needed:
- Staining brush or foam applicator
- Clean cloth
- Painter’s tape (for masking areas)
Steps:
- Mask-Off Areas: Use painter’s tape to mask off any areas you don’t want staining.
- Apply the Stain: Dip your staining brush or foam applicator into the stain and apply it toward the wood grain.
- Wipe Off Excess: After letting the stain sit for a few minutes (check manufacturer’s instructions for the exact time), use a clean cloth to wipe off any excess stain.
- Check for Evenness: Inspect the surface to ensure the stain is evenly applied. If you notice any blotchy areas, you can apply a second coat.
- Let it Dry: Allow the stain to dry completely. The drying time can vary based on the type of stain and environmental conditions.
Pro Tip: Consider using multiple stain colors for a more nuanced look. Apply the darker stain, wipe it off, and then apply a lighter stain.
Sealing the Deal: Applying a Sealant
Once the stain is dry, it’s time to seal your masterpiece. Sealants provide a protective layer, enhancing the wood’s durability and appearance.
Types of Sealants:
- Polyurethane: Offers a durable, water-resistant finish.
- Wax: Gives a soft, natural look but requires regular maintenance.
- Shellac: Quick-drying and offers a glossy finish.
Application:
- Choose your sealant based on your needs and desired finish.
- Apply a thin coat using a clean brush or cloth.
- Allow it to dry completely before using the furniture or surface.
Pro Tip: Some sealants can slightly alter the stain color, so always test on a scrap piece first.
Color Matters: How to Choose and Change Veneer Colors
Color is more than just a visual element; it’s emotional. The hue you choose for your veneer can set the mood for an entire room. But how do you go about selecting the perfect shade? And what if you want to change the color down the line?
The Color Wheel and Veneer: A Match Made in Heaven
When choosing a stain color, the color wheel is your best friend. Understanding basic color theory can help you select a hue that complements your interior design.
Key Concepts:
- Complementary Colors: Colors opposite each other on the wheel, like blue and orange, create a vibrant contrast.
- Analogous Colors: Colors next to each other, like green and blue, offer a harmonious look.
- Monochromatic Scheme: Different shades of the same color provide a cohesive and sophisticated appearance.
Pro Tip: Consider the room’s color scheme and how the stained veneer will fit.
The Role of Wood Species
Different wood species have unique undertones that can affect the final stain color. For example, oak has a yellow undertone, while cherry has a reddish one. Knowing these undertones can help you choose a stain that enhances the wood’s natural beauty.
Common Wood Species and Their Undertones:
- Oak: Yellow
- Cherry: Reddish
- Walnut: Brown
- Maple: Neutral
Pro Tip: Always test the stain on a scrap piece of the same wood species to get an accurate idea of the final color.
Tinted Stains: The Game Changer
If you’re looking to change the color of your veneer drastically, tinted stains are the way to go. These stains contain added pigment that can transform your veneer into virtually any color, from bold blues to subtle grays.
How to Use Tinted Stains:
- Choose your desired color from the tinted stain range.
- Apply as you would a regular stain, but be extra cautious about even application to avoid streaks.
- Seal with a clear sealant to lock in the color.
Pro Tip: Tinted stains are less forgiving than traditional stains, so take your time during the application process.
Lightfastness: The Test of Time
Lightfastness refers to how well a color resists fading when exposed to light. If your veneer is in a sunny area, opt for a stain with high lightfastness to ensure the color stays vibrant over time.
Pro Tip: Check the stain’s lightfastness rating on the packaging or consult the manufacturer.
Changing Colors: It’s Possible!
Changing the color of your already-stained veneer is not as daunting as it sounds. You’ll need to sand down the existing stain and start the staining process anew. However, going from a darker to a lighter color may require a wood bleach or a stain remover.
Pro Tip: If you’re unsure about changing colors, consult a professional to avoid damaging the veneer.
When Staining Isn’t an Option: Alternatives to Staining
Staining is a fantastic way to enhance the natural beauty of veneer, but it’s not the only game in town. Whether you’re dealing with a type of veneer that doesn’t take well to staining or just looking for a different aesthetic, there are plenty of alternatives.
Painting Veneer: A Splash of Color
Painting is a versatile option that allows you to transform your veneer into any color under the sun. However, painting veneer requires a different approach than staining.
Types of Paint:
- Acrylic Paint: Offers a wide range of colors and dries quickly.
- Latex Paint: Water-based and easy to clean up, but may require multiple coats for full coverage.
Steps for Painting:
- Surface Priming: Start by applying a primer to help the paint adhere to the veneer.
- Apply the Paint: Use a foam roller or brush to apply thin, even paint coats.
- Let it Dry: Allow each coat to dry completely before applying the next.
- Seal the Deal: Finish with a clear sealant to protect the paint and add durability.
Pro Tip: Always do a patch test to ensure the paint adheres to the veneer.
Veneer Decals: Stick to Style
If you’re looking for a non-permanent solution, veneer decals are a trendy and easy-to-apply option. These adhesive sheets come in various designs and can be cut to fit your piece.
How to Apply:
- Clean the veneer surface thoroughly.
- Cut the decal to fit your veneer.
- Peel off the backing and carefully stick the decal onto the veneer.
- Use a flat edge to smooth out any bubbles.
Pro Tip: Veneer decals are best for flat surfaces and should be sealed with a clear coat for added durability.
Beyond the Norm: Creative Alternatives
If you’re feeling adventurous, there are other unique ways to spruce up your veneer:
- Chalk Paint: Offers a matte finish and works well for a rustic or vintage look.
- Stenciling: Use stencils and paint to create intricate designs or patterns.
- Distressing: Use sandpaper and paint to give your veneer an aged, weathered look.
Pro Tip: Always test on a scrap piece of veneer first when trying unconventional methods.
Fixing Mistakes: The Stain Isn’t the End
Mistakes happen, but they’re not irreversible. Here are some common issues and how to fix them:
Uneven Staining
- Cause: Inadequate surface preparation or uneven application.
- Solution: Use fine-grit sandpaper to lightly sand the uneven areas and reapply the stain.
Stain Too Dark
- Cause: Excessive stain application or failure to wipe off excess.
- Solution: Use a stain stripper to remove the dark stain, then reapply a lighter coat.
Blotchy Appearance
- Cause: Poor wood conditioner application or varying wood grain.
- Solution: Apply a wood conditioner and then re-stain the surface.
Pro Tip: Always wear safety gear when using stain strippers or other chemical solutions.
FAQs
Can all types of veneer be stained?
Not all veneers take well to staining. Laminate veneers, for example, are not ideal for staining due to their non-porous nature.
How long should I wait between coats of stain?
The waiting time can vary depending on the type of stain. Always refer to the manufacturer’s instructions for specific drying times.
Can I mix different types of stains?
Mixing stains can be tricky and may result in unpredictable colors. It’s best to stick to one type of stain for a project.
How do I remove an old stain?
Old stains can be removed using stain strippers, followed by sanding. Make sure to follow all safety precautions when using chemical strippers.
What’s the best way to maintain my stained veneer?
Regular cleaning with a soft cloth and mild detergent will keep your stained veneer looking new. For added protection, consider resealing the veneer every few years.
Choosing the Right Products for the Job
You have the know-how and the right tools and products to bring your veneer staining project to life. Quality products are crucial for a successful outcome, from stains to sealants and everything in between.
Stains: The Heart of the Project

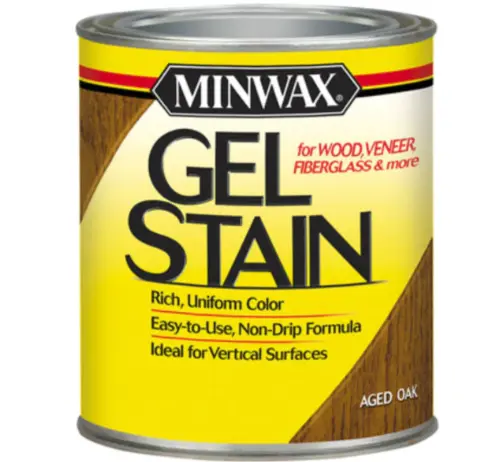
Minwax® 66020 Gel Stain for Wood/Veneer/Fiberglass, Aged Oak
Price: $25.51 USD
Why It’s Great: Minwax is a trusted brand, and their gel stain is perfect for veneer due to its thick consistency and deep penetration.

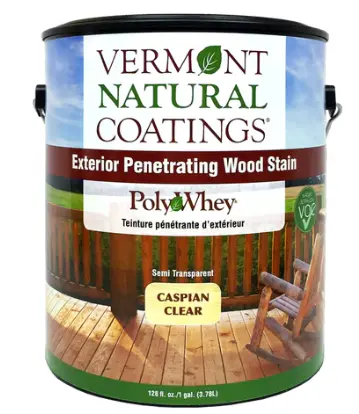
PolyWhey Exterior Penetrating Wood Stain
Price: $10.00 USD
Why It’s Great: This eco-friendly stain offers excellent penetration and is ideal for interior and exterior veneer projects.

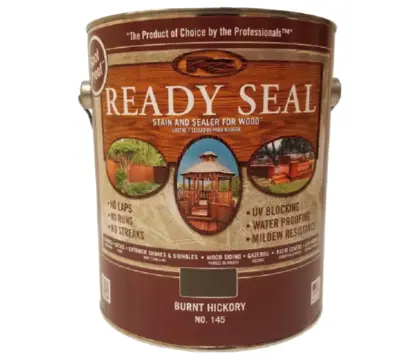
Ready Seal 145 Exterior Stain And Sealer For Wood, Burnt Hickory
Price: $45.00 USD
Why It’s Great: This is a 2-in-1 product that acts as both a stain and a sealer, saving you time and effort.
Tools: The Unsung Heroes
- Staining Brushes: Opt for natural bristle brushes for oil-based and synthetic bristle brushes for water-based stains.
- Foam Applicators: These are great for smooth surfaces and offer an even application.
- Safety Gear: Don’t skimp on safety goggles, rubber gloves, and a well-ventilated workspace.
Pro Tip: Professional-grade tools can significantly impact the final outcome, so consider investing in quality.
Where to Buy: Brick and Mortar vs. Online
- Retail Stores: Places like Home Depot and Lowe’s offer various staining products and tools.
- Online Platforms: Websites like Amazon and specialized woodworking shops offer the convenience of home delivery and often have a broader selection.
Pro Tip: If you’re new to veneer staining, consider buying from a physical store where you can get real-time advice.
Conclusion
The art and science of veneer staining have evolved significantly, with individuals now mastering the technique to transform any veneer into a work of art. Sustainability and customization drive the development of eco-friendly staining products and innovative techniques. Water-based stains with lower VOC levels and smart tools make the application process a breeze, creating a bright future for veneer staining. As a doer, creator, and veneer staining specialist, it’s essential to remember that the journey is just as important as the destination.

