
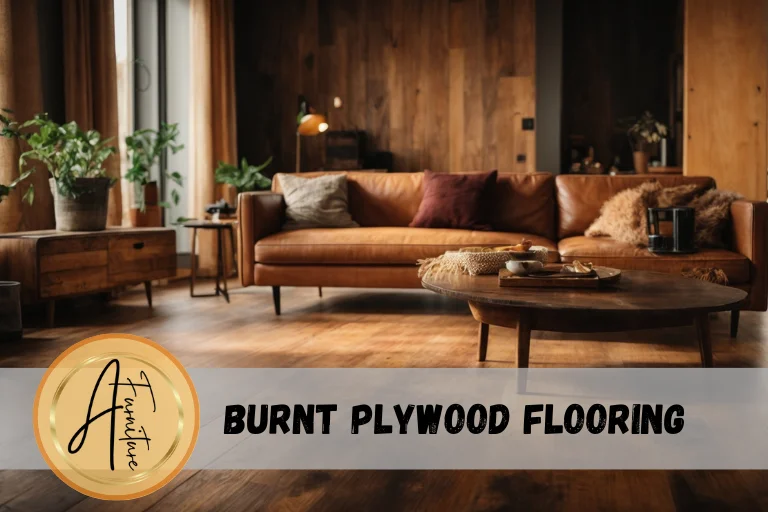
Burnt plywood flooring has become an increasingly popular option for those looking to add a rustic, distressed look to their homes. Burning and sealing the plywood brings out the natural wood grain to create beautiful, one-of-a-kind floors. This do-it-yourself project allows you to transform ordinary plywood into a gorgeous flooring option that looks like it came straight from a chic modern farmhouse.
What is Burnt Plywood Flooring?
Burnt plywood flooring involves burning the surface of plywood sheets to create a distinctive charred wood effect. The burning enhances the natural grain and knots in the wood, giving each board a unique look. Soft parts of the wood grain tend to burn more readily than the hard parts, creating striking light and dark areas. The final result is a textured, weathered appearance reminiscent of reclaimed wood.
Unlike real reclaimed wood, burnt plywood flooring achieves this look more cost-effectively. Plywood is an affordable and accessible material composed of thin sheets of wood veneer glued and pressed together. Birch, poplar and pine are common plywood types used for flooring. Once burned, the plywood is sealed with polyurethane or other protective finishes to ensure durability. This burnt plywood floor offers the beauty of real wood floors for a fraction of the cost.
The Allure of Burnt Plywood
So what makes burnt plywood flooring so popular in modern farmhouse, industrial and rustic interiors? Here are some of the factors driving homeowners to choose this unique flooring style:
Cost Savings
One of the biggest appeals of burnt plywood is the cost savings compared to solid hardwood flooring. Plywood sheets can often be purchased for $20 or less per 4×8 sheet. Home improvement stores frequently run specials dropping the prices even lower. In comparison, hardwood flooring starts at $4 per square foot installed. The DIY nature of burning the plywood provides additional savings in installation costs.
Rustic Aesthetic
The burnt and distressed appearance of the plywood creates a cozy, rustic look perfect for farmhouse designs. No two burnt plywood floors will look the same due to the natural variations in wood grain. This randomness adds to the charm and character of the floors. The floors take on an antique, weathered appearance as if they’ve been salvaged from an old barn.
Texture and Depth
The burning process brings out the natural texture and depth of the wood grain. The contrast of the charred black areas against the untouched golden wood creates visual interest. When sealed, the floors take on a subtle sheen, allowing the grain and texture shine. The texture adds coziness and warmth to any space.
Durability
When properly sealed, burnt plywood floors can be quite durable and long-lasting. The polyurethane finish protects the burnt wood from wear, foot traffic, spills and scratches. Periodic recoating will be needed, but burnt plywood holds up better than many expect. Durability makes it suitable for kitchens, hallways and other high-traffic areas.
Easy Maintenance
Burnt plywood floors are relatively easy to clean and maintain compared to hardwoods. The polyurethane finish resists dirt, spills and stains. Simply sweeping and damp mopping is all that is needed for daily care. Recoating every 2-5 years will renew protection. Avoid excessive water and harsh cleaners. The finish can be sanded and recoated to refresh the floors as needed over time.
Versatility
While burnt plywood creates a rustic farmhouse look, it can also beautifully complement modern and industrial spaces. The varied tones and texture allow it to fit diverse decor styles. Charred black plywood can create an edgy, sophisticated appearance. Overall, burnt plywood offers great versatility in design options.
How to Create Burnt Plywood Floors

One of the best aspects of burnt plywood flooring is that it can be a DIY project for the average homeowner. While wood burning requires care and safety measures, the process is relatively straightforward. Here is an overview of how to transform basic plywood into beautiful burnt wood flooring:
Choose the Plywood
Focus on high-quality, sanded plywood with few knots or defects. Appearance-grade plywood will achieve the best results. Baltic birch is a top choice, but maple and oak also work well. For a budget option, pine plywood provides an attractive charred effect at the lowest cost. Purchase full 4×8 sheets for easier installation.
Prepare the Plywood Surface
Sand the plywood sheets with 60-80 grit sandpaper to remove any finish or sealants on store-bought plywood. This allows the boards to burn evenly across the surface. Fill any cracks or holes with wood filler and sand smooth. Sweep away all dust before burning.
Burn the Plywood
This is the most crucial and delicate step in achieving the desired burnt wood effect. Work outdoors in a safe area free from flammable materials. Have a fire extinguisher and water hose on hand. Light a propane torch and systematically move it across the plywood surface in smooth, consistent motions. Apply the flame in circular patterns to char the wood. Avoid lingering too long in one area, as this can burn through the plywood layer. The torch allows you to control the burning for a graduated, natural look precisely. Alternatively, you can char the wood in a fire pit outdoors.
Sand and Prepare for Finish
Once burned, sand the plywood again with 80-100 grit sandpaper to smooth the surface. Vacuum any soot or ash. Wipe down with a damp cloth to remove dust. Apply wood filler to any cracks or holes that may have formed during burning. Sand smooth when dry. The plywood is now ready for its protective finish.
Seal and Protect the Wood
A polyurethane finish is ideal for protecting burnt plywood floors. Oil-based polyurethane provides the best moisture resistance. Apply at least 3 coats following manufacturer directions, sanding lightly between coats. Water-based poly is also an option that allows faster drying time between coats. Other durable finishes like epoxy resin or floor varnish will also work well.
Installation
Once burning and finishing are complete, installation is the same as a standard plywood subfloor. Acclimate the wood for 1-2 weeks before installation. Use construction adhesive and nails to secure the plywood sheets over the subfloor. Follow a staggered pattern, leaving 1/8″ gaps between boards. Use trim or T-molding to hide gaps along walls.
Design Inspiration
When incorporated thoughtfully, burnt plywood floors can elevate a space and become a true standout feature. Here are some inspiring ways to utilize this unique flooring:
Cozy Rustic Cabin
Embrace the rustic farmhouse vibe by pairing burnt plywood with reclaimed wood beams, antler chandeliers, braided rugs and oversized leather furniture. Add a stone fireplace for the ultimate cozy cabin living room.
Modern Industrial Loft
The varied tones and texture of burnt plywood complement sleek, modern interiors. For an industrial loft aesthetic, match with concrete walls, steel beams, and midcentury or Scandinavian inspired furniture.
Traditional Kitchens
Don’t limit burnt plywood to just rustic spaces. The floors can provide warmth and personality to traditional kitchens as well. Pair with painted or stained cabinets, granite countertops, and ceramic tile backsplashes for a nuanced look.
Masculine Spaces
With its natural yet rugged appearance, burnt plywood suits masculine spaces like home offices, workshops and “man caves” nicely. Match with leather chairs, dark walls and a mix of wood, steel and concrete finishes.
Bohemian Style
For a relaxed bohemian living room, burnt plywood floors help balance colorful textiles, wooded furniture and abundant houseplants. Add a Southwestern or tribal rug to pull the space together.
No matter your decor style, burnt plywood offers versatility to complement both vintage and contemporary aesthetics. Let the unique floors be the inspiration for your interior design choices.
Maintaining and Protecting Your Floors
While proper sealing protects burnt plywood floors, some simple maintenance practices will keep them looking their best for years. Here are some care tips:
- Sweep regularly to keep dirt and debris from building up. Use a soft bristle broom.
- Wipe spills immediately to avoid staining. Use a damp mop only – excess water can damage the finish.
- Place rugs at entryways and under furniture legs to minimize scratches. Rotate rugs to allow even UV exposure.
- Recoat high traffic areas like hallways as needed when the finish starts looking dull. Apply fresh polyurethane every 2-5 years.
- Use felt pads under chair legs and furniture feet to prevent scratches.
- Avoid harsh cleaners, bleach, ammonia or abrasive scrubbing pads.
- Consider keeping pets’ nails trimmed to avoid excessive scratching.
FAQs about Burnt Plywood Flooring
Many homeowners considering burnt plywood floors have questions about the process and how to achieve the best results. Here are answers to some of the most frequently asked questions:
What type of plywood works best?
High-quality hardwood plywoods like birch and oak burn and char the most evenly. They bring out the wood grain details beautifully. More affordable softwoods like pine can work too but may be more prone to burning through.
Can I burn plywood indoors?
It’s not recommended due to safety concerns and fumes. Outdoors is ideal. A well-ventilated garage could work if care is taken. Have proper fire suppression tools on hand.
How dark should I burn the wood?
This comes down to personal preference for the amount of charring and variation. Slight burning hints at blackening while heavy charring makes bolder black streaks across the wood. Too much burning can compromise the strength of the plywood.
Should I stain the burnt plywood?
Staining can help further enhance the burnt wood effect. Penetrating stains in dark walnut, espresso or ebony accentuate the blackened areas. Staining is optional – sealant alone leaves a natural burnt wood look.
What finish is best for burnt plywood?
An oil-based polyurethane finish offers the greatest protection from moisture and scratching. Use satin or semi-gloss sheens to allow the texture and grain to show through.
Can burnt plywood get wet?
The polyurethane finish makes burnt plywood water resistant. However, standing water or excessive moisture can still damage the wood over time. Quickly clean up spills for best results.
How long does burnt plywood flooring last?
Proper prep, burning, sealing and care can last 10-15 years. High-traffic areas may require finish recoating every 2-5 years. Proper maintenance is key to longevity.
Can burnt plywood be refinished?
Yes, when the floor starts looking worn you can sand away the top layer and reapply fresh polyurethane. This refreshes the protection and appearance of the flooring.
Is burnt plywood flooring expensive?
The DIY nature makes it one of the most budget-friendly flooring options. The plywood sheets are inexpensive compared to hardwood flooring or engineered wood planks.
Safety Tips for Burning Plywood
While burnt plywood flooring adds undeniable character to a home, safety should always be the top priority when burning the wood. Follow these tips for maximum fire protection:
- Work outdoors in an open, empty area away from buildings, trees and dry brush.
- Have a charged water hose and fire extinguisher within reach. Designate someone to be in charge of fire watch.
- Avoid burning on windy days when embers could spread quickly.
- Wear safety glasses and gloves to protect from sparks and heat.
- Keep burn sessions short to avoid excessive smoldering and smoke buildup.
- Let boards cool fully before burning additional pieces or stacking. Check for hot spots.
- Dispose of ashes in a metal bucket once completely cooled.
- Work slowly and carefully. Don’t let the flame linger too long in one spot.
- Have a helper to provide an extra set of eyes monitoring for flare-ups.
- Exercise caution around knots in the wood, as they burn rapidly.
By being prepared and vigilant, you can safely achieve stunning burnt plywood floors to install in your home. Always prioritize fire safety throughout the entire process. Your new floor will provide enjoyment for years to come.
Achieving Unique Rustic Floors with Burnt Plywood
For homeowners seeking affordable, one-of-a-kind wood floors, burnt plywood provides an ideal solution. The charred, textured appearance transforms ordinary plywood into a beautiful rustic flooring option. You can complete this project by utilizing basic tools and safety precautions.
While it requires some time and elbow grease, the result is floors with timeworn character that look straight out of a design magazine. The burnt floors will infuse any room with cozy warmth and farmhouse charm. As more people discover this unique flooring technique, burnt plywood is guaranteed to grow in popularity for years.
Alternatives to Burnt Plywood Flooring
While burnt plywood delivers undeniable rustic charm, it may not be the right choice for every home or project budget. Fortunately, several alternatives can achieve the distressed, weathered wood look at different price points.
Wire Brushed Wood
Wire brushing wood flooring is a technique that uses a coarse brush to expose the natural grain and texture of the wood. The brushing removes softer wood portions, resulting in a scratched, brushed appearance. Oak, hickory, and walnut are common wire brushed wood species. This approach allows you to achieve a similar worn, multi-toned look as burnt plywood for a comparable cost.
Barnwood Planks
For those seeking authentic reclaimed floors, consider salvaged barnwood planks. These are old weathered wood boards salvaged from barns, homes, and other structures. The wood displays cracks, nail holes, stains, and other imperfections that add to the antique character. Barnwood delivers truly one-of-a-kind floors. Availability can be limited based on geographic area.
Hand Scraped Wood
Hand scraping manually scrapes hardwood planks to create surface texture and irregular grooves. It removes the soft grain to expose an aged, timeworn appearance. This artisanal wood flooring alternative provides instant old-world charm. Brazilian walnut and hickory are commonly hand scraped.
Distressed Engineered Hardwood
Many engineered hardwood floors now come pre-distressed with pronounced dents, scrapes, and wormholes recreating a reclaimed wood aesthetic. Built-in stains and finish variations mimic weathering for authenticity. Brands like Millstead and Virginia Mill Works offer quality distressed engineered collections. This provides an easy installation alternative to achieving the rustic look.
Painted Plywood
As a budget option, consider painting plywood planks in charcoal or black tones and then sanding once dry to expose wood grain texture. The layered paint and sanding treatment mimics the multi-toned effect of burnt plywood floors. Top coats like polyurethane finish and seal the DIY-friendly floors.
Weighing the Pros and Cons
When evaluating the many alternatives to burnt plywood, consider the following pros and cons:
Cost
- Burnt plywood is typically the most budget-friendly option for getting the distressed look.
- Barnwood is on the pricier end due to limited supply.
- Painted plywood is the cheapest choice.
Installation
- Burnt plywood is relatively easy for DIYers to install.
- Barnwood and engineered wood require professional installation.
- Homeowners can install painted plywood.
Durability
- Wire brushed and scraped wood are quite durable for high-traffic areas.
- Barnwood is prone to scratches due to its soft nature.
- Burnt plywood falls in the middle for durability when properly sealed.
Unique Look
- Burnt plywood offers the most one-of-a-kind appearance since no two boards are the same.
- Barnwood and hand scraped also achieve truly unique looks.
- Wire brushed and engineered woods lean more uniform in appearance.
No matter which option you choose, you can rest assured knowing there are many ways to achieve the trendy burnt wood aesthetic with creativity and the right materials. Analyze your budget, lifestyle, and goals for your space, then select the ideal flooring to bring your rustic vision to life.