
Are you planning to stain your wooden fence, facade, or patio black?
Then we are happy to help you with information about the different types of black outdoor stain, a step-by-step plan for ‘Black Staining,’ and maintenance tips.
This way, you will have the best and most beautiful result, without visible stripes and spots!
Why use black stain?
The main reason for staining is to protect the wood. Outdoor stain protects the wood against external weather influences and ensures that the wood can continue to “breathe.”
You can also give your furniture, shed, facade, or other wood precisely the look you want with stain.
You can brighten up beautifully faded wood with a transparent stain because (standard) transparent stain gives the wood a warm color.
Color differences arise, and the veins become more visible.
You can stain your desired project environmentally friendly with opaque black and give it a rural look with black stain.
Stain is, therefore, perfect addition and a must if you want beautiful staining or painting as a result.
Stain can also be applied as a base layer under lacquer paint, but on wood that is not dimensionally stable, such as facade cladding and paneling, you often work with a pure outdoor stain system.
Read: Types of wood finishes.
So you can easily stain your garden house with a black or matte black stain for a rustic result.
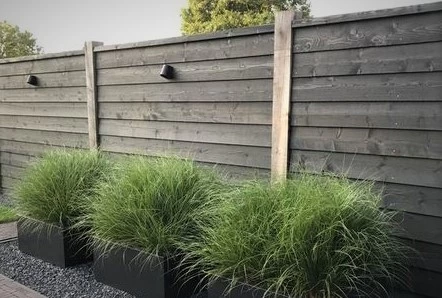
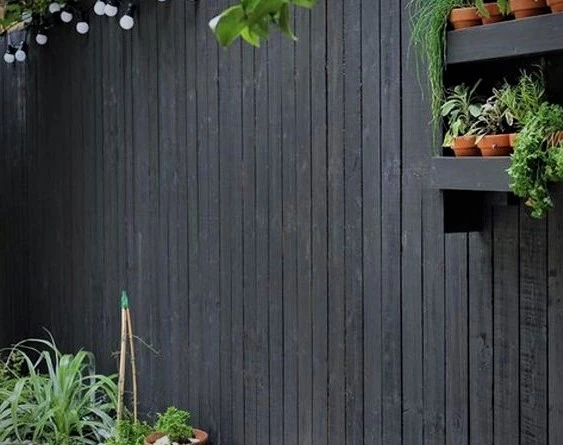
Create a rural look with black stain
You can create a rural look both indoors and outdoors. You use many natural materials and colors for this.
Black garden stain fits perfectly; for example, have you ever thought about staining the wooden facade clothing of your home black? Or the fence or fencing?
In this way, you add the black elements that fit so well into the rural look. And on sleek facade claddings of modern homes, it also looks cool, robust, and radiates modest class.
Black stain for indoors
Nice to know; you can also use water-based, black stains indoors. Your interior can also be adapted to the country style mentioned above (or any other style with black elements).
In addition, it is a simple and affordable way to renew your interior. For example, paint or stain your wooden wall, kitchen, or cupboard(s) black.
Your house will immediately get a completely different atmosphere and style!
Which black stains are there?
There are many types of stains. There is a suitable variant for every project, for every desired result.
During the orientation or purchase process, you ask yourself what color you would like.
For this blog, we focus on the black variant. There are also different brands and types of black stains available online.
For example, RAL 9005 is the deepest black color of the stain.
But a distinction can also be made between satin gloss and matt stains.
Each type of stain gives a different effect.
You then have to consider whether you will apply the stain (largely) indoors or outdoors.
Inside, you only use a water-based stain; water-based and turpentine-based stains are suitable for outdoor applications.
You have an option to choose a biobased or natural stain.
It is best to choose a water-based stain for a faster drying process, less yellowing, and a less strong smell.
Stains based on turpentine and oil-based impregnate a little more.
By impregnation, we mean penetrating the wood with the stain.
This allows the stain to penetrate even more into the upper wood cells. We therefore always recommend using a turpentine/oil-based stain on the hardwood.
Finally, you decide whether you want to use a transparent or opaque stain.
Opaque matte black stain, for example, gives an even result without color differences. With a transparent stain, color nuances are visible in the wood.
The wood structure, grain, and eyes of the wood are emphasized more. So plenty of choices!
How do I stain wood black correctly?
You may have seen beautiful examples of a black-stained gazebo online. Or did you see with friends how the facade cladding with black stain makes the house extra stylish?
Wherever you find the inspiration, you can’t wait to start your project! When staining wood, it is recommended to work in dry weather conditions and at an outside temperature of 10 degrees or more.
But what is the best order for staining a garden house, veranda, shed, or cladding? Are there points I should take into account?
We are happy to help you on your way with our step-by-step plan for ‘Black Staining.’
First of all, the supplies:
- Black stain, for example, RAL 9005
- An old cloth
- painter’s gloves
- A preferably flat brush for white spirit paint or water-based paint
- A paint tray/ironing kettle with possibly an insert keg
- A stirrer or stir stick
The step-by-step plan for black staining wood
1. Cleaning
Before you can start staining, the wood must be free of grease, dirt, and contaminants. New clean wood does not need to be cleaned.
Existing old paint layers should always be degreased well. You can do this properly and responsibly with a solution of Cleaner/Degreaser in water (1:20 for heavy pollution, 1:40 for normal pollution).
Always rinse with clean water after cleaning. When the wood is dry, remove unsound old layers of paint by scraping or blow-drying.
2. Sanding wood
Now comes the sanding. Old, existing paint layers on smooth planed wood are best matted with sandpaper/sanding pads in the coarseness P220.
Dust the wood well afterward and have everything you need ready. It is best to remove loose fibers from newly sawn wood by brushing it off with a medium-hard household brush.
Sanding brushes P80, which you can mount on an angle grinder, are useful on treated sawn wood. You can now start with the real staining work.
3. Staining wood
Put on the painter’s gloves to protect your hands. Stir the stain well with the stirring stick or shake the can well beforehand (check whether the lid is tight!).
Put the desired amount of stain into the paint tray/iron kettle/insert keg and use a flat brush, round brush, or pickling roller to apply the first coat. Paint with the grain of the wood.
Apply two coats of stain. Especially on new wood, two layers is the minimum. Adhere to the drying time of the product before applying the second coat.
You can apply a third coat of stain on new wood if desired. With the application of this third layer, the wood also lasts 2 to 3 years longer on average.
Finally, let the stain harden well. You can now enjoy the result! It is essential to check your staining work every year, especially when it has experienced extreme weather (hot summers, cold winters).
Black stain maintenance tips
Black surfaces absorb more heat, and black stain is no exception. When the wood heats up, it can crack. You limit this risk by using a stain that is limited to non-film forming.
With the application of 2 layers of opaque stain, the wood lasts 4 to 5 years.
Bring your three e layer, and you can see here one to two years count. However, it remains essential to carry out an annual check.
Due to the higher load, the maintenance intervals are always shorter on sides heavily exposed to the sun and on the coast.
Maintenance is required more often, especially with the warm, sunny summers of recent years.
You determine each year whether a new layer of black stain is needed.
We recommend that you don’t put this off too long. If you continue to maintain the wood regularly and do not let it age too much, maintenance is less (time) intensive.
The maintenance process is not complicated.
Before you start, it is important to degrease the wood, preferably with a cleaner or Degreaser.
This is economical in use and easy to apply with, for example, a plant sprayer. Then you can rinse it with a sponge and brush or spray it off with clean water.
If you see (minor) flaws, these are your focus points.
It is important to consider these details as well. Sometimes it is necessary to repaint the spots. To do this, follow the step-by-step plan given earlier.
Thoroughly clean and degrease, remove unsound paint layers and sand the wood if necessary. For smooth planed surfaces, you can sand the wood with 220 grit sanding pads.
If it concerns a hard surface, a hard brush will suffice.
It is best to sand down nasty spots on sawn wood with P80 sanding pads down to the healthy wood.
If there are places where you see bare wood, touch them up twice. You then paint the whole thing over once.
If it concerns strongly aged wood or a major color change, apply two layers.